Introduction to Arduino
Arduino is an open-source, easy to use platform used for various electronics projects. It has a physical programmable circuit board. The capabilities of Arduino depends on the capabilities of the the microcontroller it's holding.
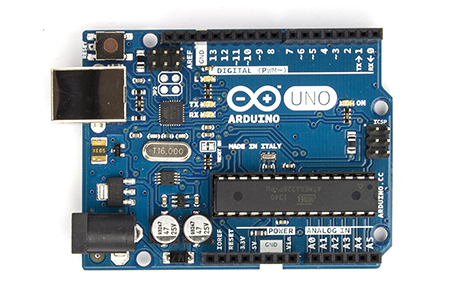
There are various types of Arduino's available in the market and the most popular one is called Arduino UNO. For instance, Arduino UNO uses ATMega328P and hence various specs depend on it.
In most applications, Arduino reads the inputs from the sensors, and takes action depending on the logic that has been programmed into it.
Jeremy Blum's Arduino tutorials on the YouTube are one of the best out there, watch the first three videos to get the basic understanding of Arduino.
Link: https://www.youtube.com/playlist?list=PLV009FNOX7Tf-XSyghg2vrSYXw1QcCHaX
Hardware
We will be talking mostly about Arduino UNO here. It has 20 I/O pins which means that these pins can be used to either take digital inputs, or provide digital outputs.
The pins are labelled as D0, D1, D2, ..., D13 and A0, A1, A2, ..., A5 which makes a total of 20 pins. The speciality of the pins labelled with A is that apart from digital input and output, they can also take analog inputs from sensors.
Values from various sensors can be read at the input pins and outputs can be activated accordingly.
Software
Arduino comes with a easy-to-use software that is available on their website (arduino.cc). It can be used to write code, compile it and then upload it onto the Arduino that can be used in your projects.
Here's how the code is organised in Arduino.
// initializations here
void setup(){
    // setup code here
}
void loop(){
    // loop code here
}
The setup() function only runs once and that is at the start of the program with the initializations above. The loop() runs continously after the setup is executed once. This code in the loop() function continues to run till the board is reset again.
Let us look at a sample code and try to understand how it works.
#define LED_PIN 13

void setup() {
    pinMode(LED_PIN, OUTPUT);       // Enable pin 13 for digital output
}

void loop() {
    digitalWrite(LED_PIN, HIGH);    // Turn on the LED
    delay(1000);                    // Wait one second (1000 milliseconds)
    digitalWrite(LED_PIN, LOW);     // Turn off the LED
    delay(1000);                    // Wait one second
}
The LED_PIN variable is set to a value of 13. In the setup() function, the pin D13 is set as a digital output pin by using the pinMode function.
In loop() function, the output state of the digital pin can be changed by setting it to high or low using the digitalWrite function. A small time wait is executed by using the delay() function. If an LED is connected to the output pin of the Arduino, this code will blink the LED with a time period of two seconds.
Next, let's understand how various sensors can be connected and used with Arduino.